How to Edit Natural Light Newborn Photos
A major part of building your brand as a newborn photographer is finding your editing style. Oftentimes, newer photographers try different editing styles for every session they do, but as you start to book more paid work, you want your potential clients to have a clear idea of what style of images they will receive in their final gallery. As a natural light in-home newborn photographer, I aim to have a natural, timeless look, so my edits are typically fairly true to color with a soft filmy feel. So, how to edit in-home newborn photos in this style? Let’s take a look at my typical process using Adobe Lightroom.
All the photos in this post display a before and after– just move the slider to view the ‘before’ on the left and ‘after’ on the right.


Step-by-Step Process for Editing In-Home Natural Light Newborn Photos
First, let’s look at my overall process for each gallery, then we’ll get into more detail for editing individual images.
- Cull images in the gallery: Eliminate images that won’t be included in the final gallery, and mark favorites along the way. In Lightroom, I mark the keepers as 4 stars, rejects as 1 star, and favorites as ‘picks’ (just hit the P key). Then I filter by only images marked 4 stars so I no longer see the rejects.
- Do edits on favorites: I start by filtering the gallery to only show my picks. Then I do my edits on just these photos to start.
- Second round of culling: Go through one more round of culling to get the gallery down to its final number. Usually after the first round of culling, I have around 200 images, and then after the second round, anywhere from 75-125 or so, but I don’t limit myself to a specific number.
- Sync settings from the edited favorites to the rest of the images: Select an already edited image, then add to your selection all the rest of the photos from that set (for example, all the photos in the nursery). Click the ‘sync settings’ button and copy the settings with everything checked except for masking, healing, crop, and transform, which are settings that should be done individually on each image.
- Make individual adjustments on every photo: Go through each image to tweak the settings and make it perfect. It is quite rare for me to have the exact same settings on multiple images. Adjust things like white balance, crop, exposure, etc so each image is looking great.
- Fix blemishes/ distracting elements: On my first round of edits (step 5), I ignore any blemishes etc, so I can stay focused on the overall feel of each photo. After those initial edits are done, I go back through the gallery starting at the beginning, and use the healing tool to remove any distracting blemishes, lint on clothing, etc. There are several healing tool options, but I most often use Content Aware Remove.
- Scroll through the finished gallery in Library mode: Make sure it looks cohesive as a whole before sending it off to the client. This is quick but important!
- Rename photos: Don’t keep your original filenames from the camera, it looks much more professional to rename them and have them in their sequence. I typically use this setup – ALP_session date_Sequence. Lightroom will automatically do their number sequence in order.
- Export images as high res jpegs: And deliver to your client!


How to Edit Natural Light Newborn Photos
First of all, the absolute key to beautiful edits has everything to do with starting with photos that look great straight out of the camera. For photographers who are just starting out, this is easier said than done, but is great motivation to really learn about proper lighting and camera settings. Think of editing as the final touches to your images, rather than a way to fix poor technique. Proper lighting with correct exposure! I tend to shoot slightly underexposed so I can pull back more detail from the highlights while editing. Let’s get into the nitty gritty of how to edit natural light newborn photos.


Add Your Base Preset
Purchased presets can be helpful as you hone your style. They help you learn how to achieve the look you want. That being said, presets are not one-size fits all. Though I’ve used various purchased presets over the years, I mostly used them as a stepping stone to learn what adjustments to make to get my images the way I desire. Using those learned skills, I was able to make my own preset that works wonderfully for my specific way of shooting. So whether you’re using one you purchased, or one you created yourself, the first step in editing is always to add your preset.


Camera Profile
The camera profile setting controls the way the colors from your raw images appear. For my Canon R6 camera, I’ve found that I prefer using the Adobe Standard profile, but you may want to try various options to find what you like best for your own camera.


Typical Adjustments to make on Every Image
- White Balance – even if you set a specific white balance in camera, you may often need to make slight adjustments to keep every image cohesive, since natural light is constantly changing.
- Exposure – This should be pretty close to perfect straight out of camera, but sometimes needs a boost in either direction
- Highlights/ Shadows/ Whites/ Blacks – I generally raise the blacks and shadows while lowering the whites and highlights, to give a softer, low contrast look.
- Color Mixer (Hue/ Saturation/ Luminance) – I like soft colors in order to have that really natural look, so I tend to lower the saturation on most colors. Pay particular attention to oranges and reds since these are where most skin tones typically fall. Adjustments to the saturation and luminance of orange will vary depending on the skin tone of the subjects in the photos. Darker skin tones generally benefit from a lower orange saturation and luminance. Lighter skin tones typically benefit from a higher orange luminance. Lowering the yellow saturation can also help in rooms that may have a bit of a color cast on white walls.
- Crop – Make sure everything is straight and well-composed.


Other Settings I use all the Time
- Dehaze – This is similar to the contrast slider, but also affects the colors without being as noticeable as changing the saturation. Lowering the dehaze slider gives a nice soft look to your photos if they are looking too high in contrast. I love the dreamy look it helps to achieve.
- Grain – Newer mirrorless cameras are incredibly sharp, which is wonderful, but also takes away a bit from the timeless look of the photos. To bring back a bit of a film look, I generally add grain to my images. But only if I’m shooting at a fairly low ISO, since higher ISOs will naturally be more noisy.
- Luminance Noise Reduction – In darker homes or on cloudy days, you may be shooting at pretty high ISOs in order to get your exposure correct. This slider is very helpful in minimizing the resulting noise!
- Guided Upright Tool (Transform Panel) – Though I don’t always use this, it is one of my very favorite tools in Lightroom! Sometimes rotating your crop just doesn’t fully straighten your photo due to the angle the original image was taken at. Using the guided upright tool, you draw up to four lines (guides) along areas that should be straight (like the edge of the floor, or the side of a window), and it will give you a beautifully straight image!
- Healing Tool – This is an easy way to remove small distracting elements from your images, like pimples, newborn skin flakes, or lint on clothing. I typically use the Content-Aware Healing tool, but sometimes use the regular Heal tool if content-aware can’t figure out what I want.


When to Bring an Image into Photoshop
I rarely need to take an image into Photoshop as I don’t need heavy edits in order to achieve the more timeless natural light style. There are some situations where Photoshop is helpful though! For example, if an image needs a head swap, if there is a larger item that needs to be removed (i.e. bright distracting toy in the background), or if a baby has a significant number of skin blemishes (I mostly use the spot healing brush tool or patch tool for this).
A seamless way to take an image from Lightroom to Photoshop is to select it in Lightroom, type CMD+E to open it in Photoshop, then CMD+S to save it back to Lightroom when you’re finished with your Photoshop edits. This creates a new copy of the photo right in your Lightroom catalog, and you can mark the unedited version as a lower star rating so it’s not included in the final gallery.
A newer tool in Photoshop that is very handy for removing distracting objects is Generative Fill. Select the area that needs to be removed, leave the prompt box empty, and hit ‘generate’. It will give you three options to choose from and generally does a really excellent job.


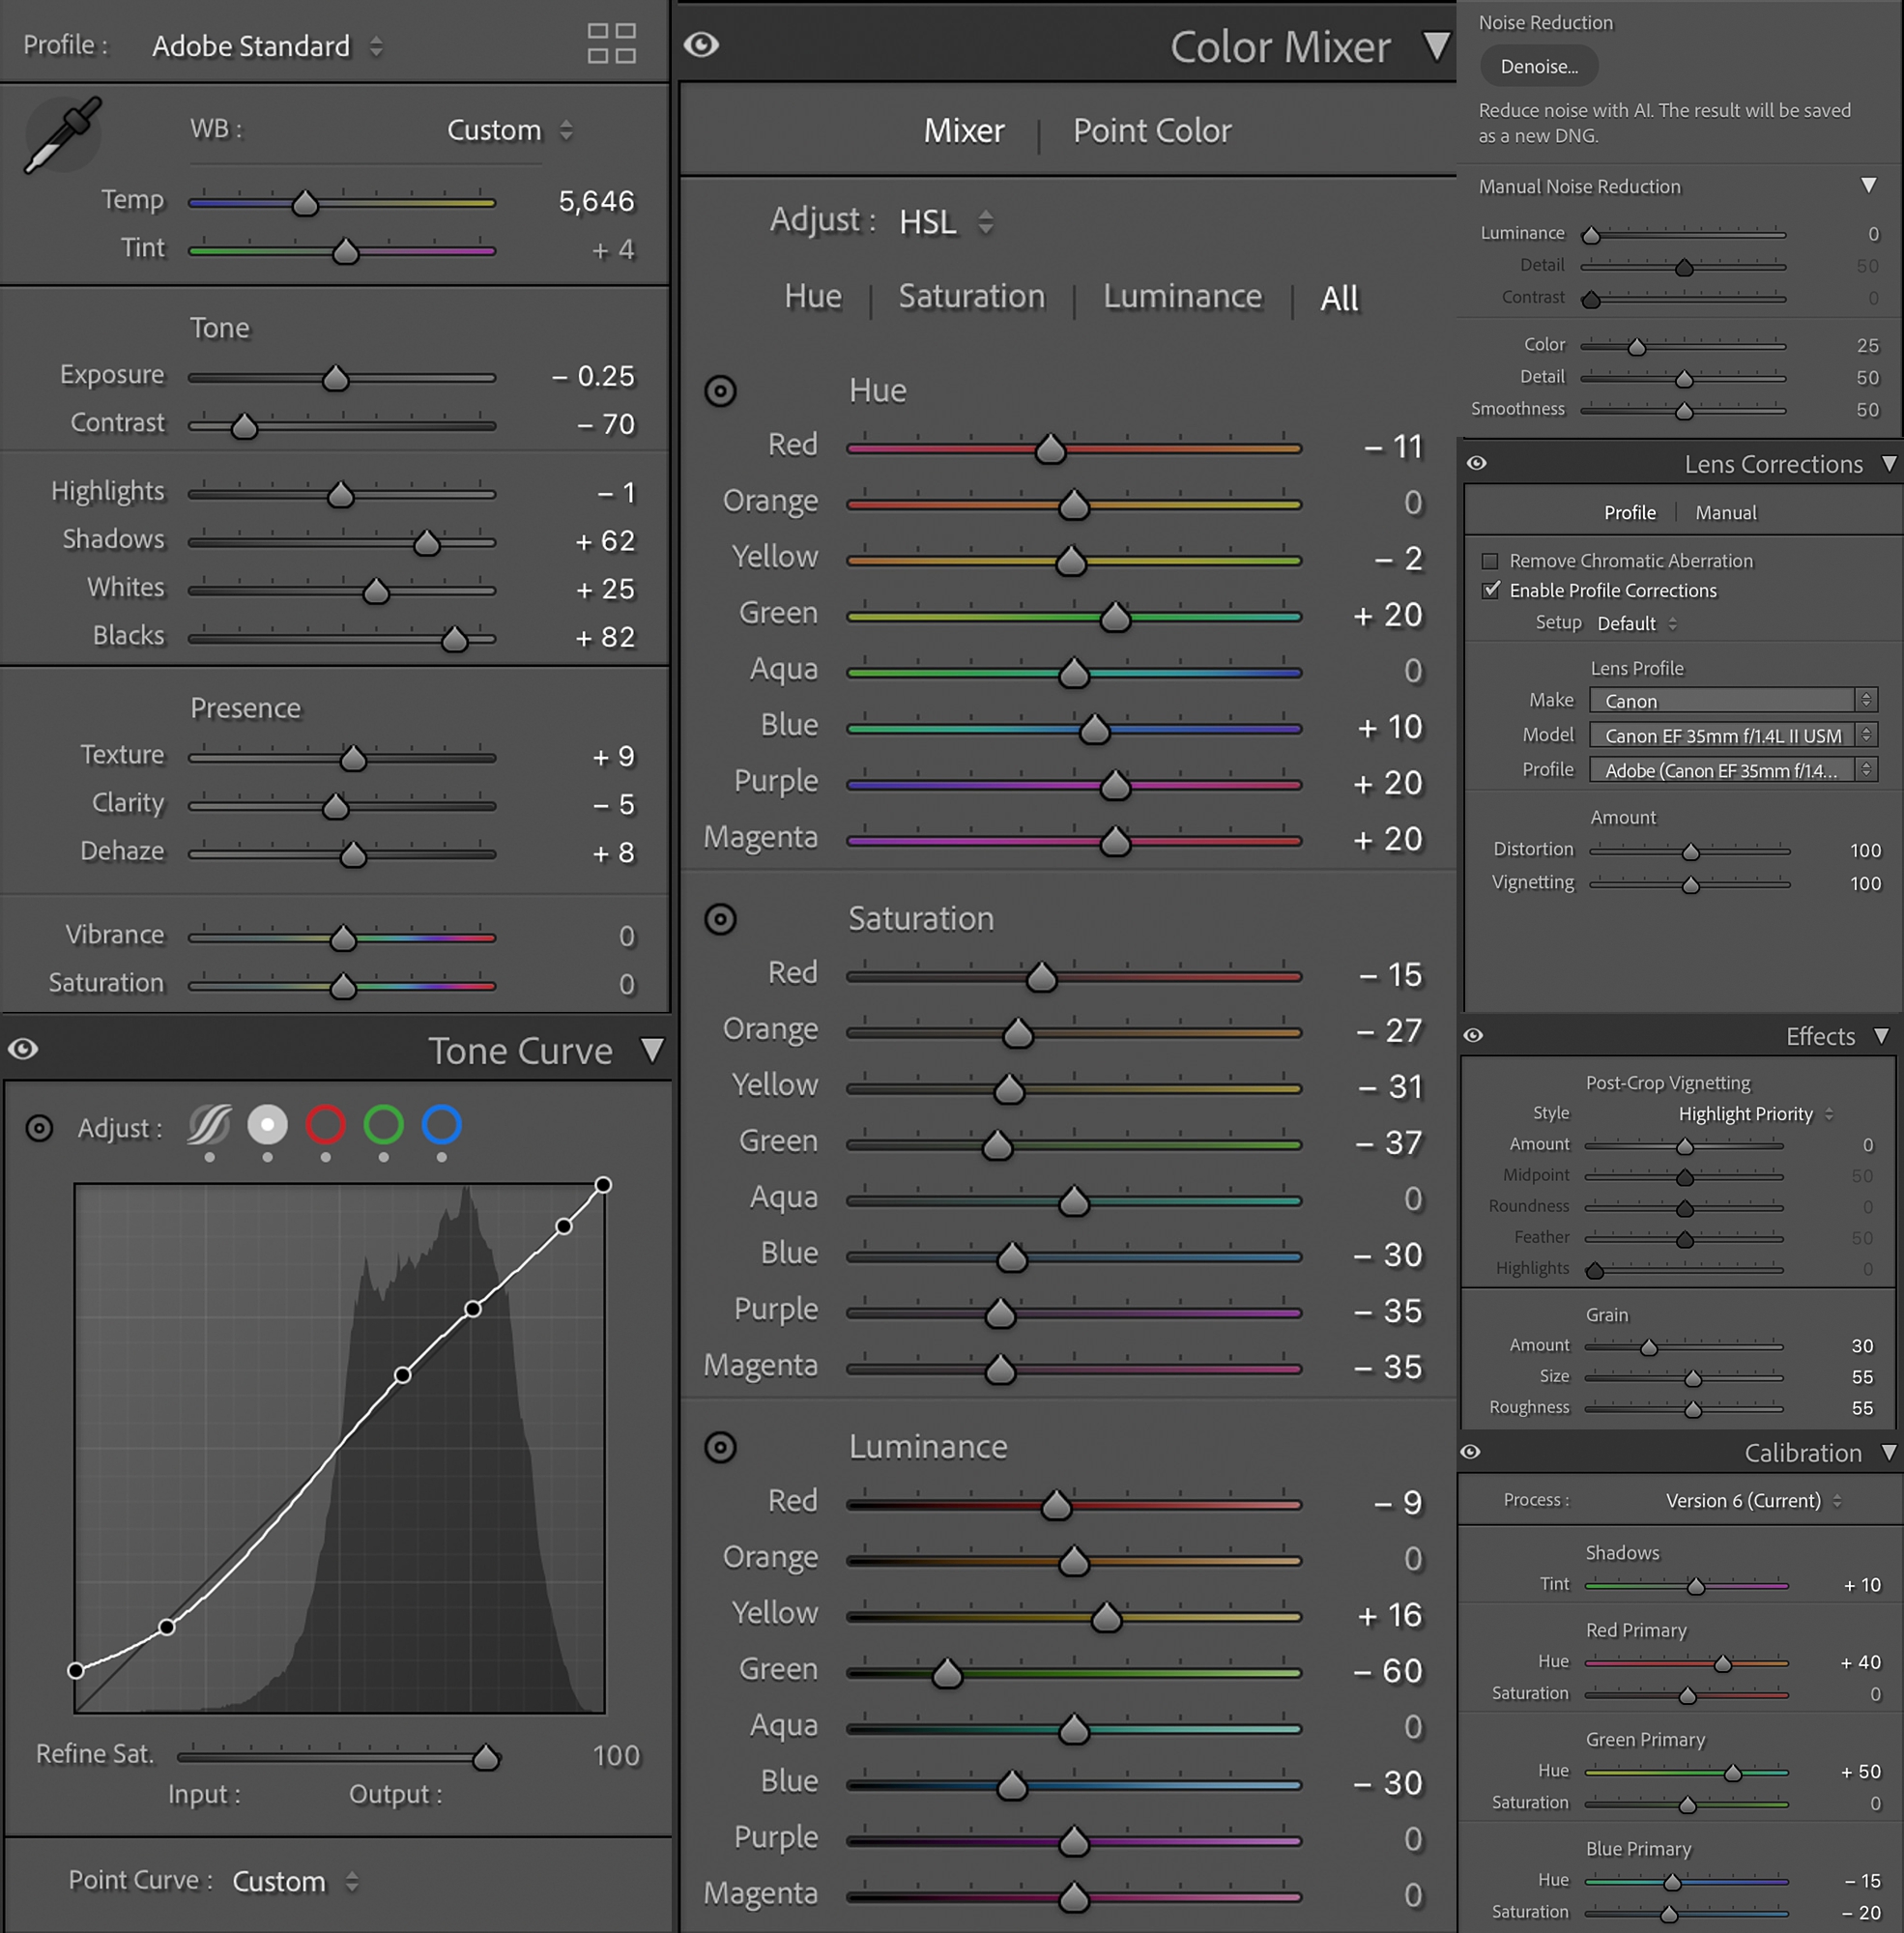
Let’s Take A Look at an example of my Exact Settings for an Edited Photo
Below this photo, check out my exact Lightroom settings for it.


Final Notes on How to Edit Natural Light In-Home Newborn Photos
Overall, when editing newborn photos for a more natural and timeless look, aim to keep all your adjustments minimal. It doesn’t have to be an extreme departure from the image straight out of camera. Embrace the mood– if it was a bright house, keep with that light and bright feel, but if it was a moodier lighting situation, don’t try to force it to be bright. Keep that vibe! Most important is to just enhance the already lovely quality of your photos while keeping the gallery cohesive.


I am more than happy to answer any questions you might have! Feel free to reach out on my contact page here.